

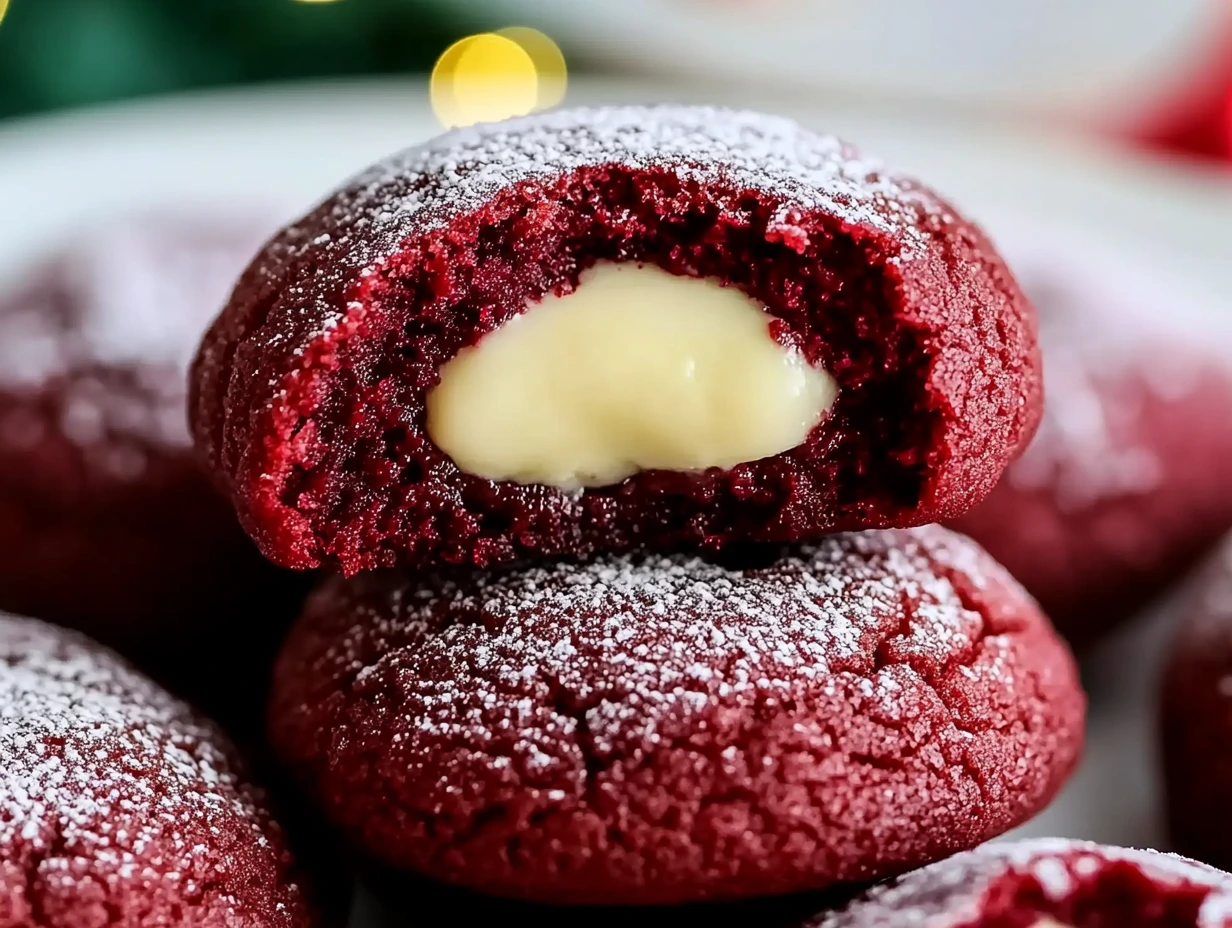
There’s something undeniably magical about red velvet desserts, especially around the holidays. The rich, cocoa-infused flavor, that signature deep red color, and the velvety texture make it an irresistible classic. And when you take all that goodness and turn it into soft, chewy thumbprint cookies filled with a luscious cream cheese center? Absolute perfection!
These Red Velvet Thumbprint Cookies with Cream Cheese are a festive treat that looks just as good as they taste. The soft, slightly chocolatey cookie pairs beautifully with the smooth, tangy cream cheese filling, making them an instant holiday favorite. Plus, they’re rolled in sparkling sanding sugar for an extra touch of festive cheer! Whether you’re making them for a cookie exchange, a holiday gathering, or just to treat yourself, this recipe is sure to impress.
So, grab your mixing bowls, and let’s get started on these delicious little bites of red velvet heaven!
Making the Cookie Dough: The Heart of Red Velvet Goodness
The first step in any great cookie recipe is preparing the dough. For these thumbprint cookies, we’re using simple, classic ingredients to create a soft, tender cookie with just the right hint of cocoa.
Step 1: Creaming the Butter and Sugar
Start by beating ½ cup of unsalted butter and ¾ cup of granulated sugar in a large mixing bowl. You’ll want to use an electric mixer for this to get that light and fluffy texture. This step is crucial because it creates air pockets in the butter, which helps give the cookies their soft texture.
Step 2: Mixing in the Wet Ingredients
Once the butter and sugar are well combined, add in 1 large egg, 1 teaspoon of vanilla extract, and 1 teaspoon of red food coloring. Mix everything together until the batter is smooth and evenly colored. The red food coloring is what gives these cookies their signature look, so don’t be shy with it! If you want an even deeper red hue, you can add an extra drop or two.
Step 3: Incorporating the Dry Ingredients
In a separate bowl, sift together 1¼ cups of all-purpose flour, 2 tablespoons of cocoa powder, ¼ teaspoon of baking soda, and ⅛ teaspoon of salt. Sifting helps break up any lumps and ensures that the dry ingredients mix evenly into the dough.
Gradually add the dry ingredients to the wet mixture, stirring until everything comes together into a soft dough. At this point, the dough will be slightly sticky but thick enough to roll into balls later.
Chilling the Dough: The Secret to Perfect Cookies
Now, here’s a step you don’t want to skip—chilling the dough. Once your dough is mixed, cover it with plastic wrap and pop it into the fridge for at least 30 minutes. This might seem like an unnecessary delay, but trust me, it makes all the difference!
Why? Because chilling the dough helps:
- Prevent the cookies from spreading too much while baking
- Enhance the flavors by letting the ingredients meld together
- Make it easier to roll into perfect little cookie balls
If you’re short on time, you can speed things up by placing the dough in the freezer for about 15 minutes.
Step 4: Rolling and Shaping the Cookies
Once your dough has chilled for at least 30 minutes, it will be much easier to handle. Grab a tablespoon-sized scoop and roll the dough into 1-inch balls using your hands.
For an extra festive touch, roll each dough ball in ¼ cup of holiday sanding sugar before placing them on a lined baking sheet. The sanding sugar not only adds a beautiful sparkle but also gives the cookies a slight crunch on the outside while keeping the inside soft and chewy.
Step 5: Creating the Thumbprint Indentation
Now for the signature thumbprint! Gently press your thumb (or the back of a spoon) into the center of each dough ball to create a small indentation. Be careful not to press too hard—you want a deep enough well to hold the cream cheese filling later, but you don’t want to flatten the cookie completely.
If the dough cracks slightly around the edges, don’t worry! You can gently smooth them out with your fingers, but a little cracking just adds to their homemade charm.
Step 6: Baking to Perfection
Preheat your oven to 350°F (175°C) and bake the cookies for 10-12 minutes, or until the edges are set. The centers might look slightly underdone, but that’s okay! They’ll continue to firm up as they cool.
Once they’re done, remove the cookies from the oven and let them cool on the baking sheet for about 5 minutes before transferring them to a wire rack to cool completely. This cooling step is important because the warm cookies are still soft and need time to firm up before we add the filling.
Making the Cream Cheese Filling: The Perfect Sweet & Tangy Center
Now that our cookies are baked and cooling, let’s move on to the best part—the creamy, dreamy cream cheese filling. This filling is what takes these cookies from delicious to downright irresistible!
Step 7: Mixing the Filling
In a small mixing bowl, beat together:
- 4 ounces of softened cream cheese
- ¼ cup of powdered sugar
- ½ teaspoon of vanilla extract
Using a hand mixer (or a good old-fashioned whisk), beat everything until it’s smooth, creamy, and lump-free. The result should be a slightly thick yet pipeable filling that’s perfectly sweet with just the right amount of tang from the cream cheese.
Step 8: Filling the Cookies
Once your cookies have completely cooled, it’s time to fill those thumbprints! You have two options here:
- Spoon the filling directly into the indentations for a rustic, homemade look.
- Use a piping bag (or a ziplock bag with the corner snipped off) for a neater, more polished finish.
Whichever method you choose, make sure to fill each thumbprint generously—after all, the cream cheese filling is the star of the show!
Step 9: Letting the Filling Set
To help the filling firm up, place the cookies in the refrigerator for at least 15 minutes before serving. This step ensures that the cream cheese holds its shape and doesn’t become too soft at room temperature.
And that’s it! Your Red Velvet Thumbprint Cookies are ready to be devoured. They’re soft, chewy, filled with luscious cream cheese, and coated in sparkling sugar for the ultimate festive treat.

FAQ: All Your Red Velvet Thumbprint Cookie Questions Answered
Baking a new recipe always comes with a few questions, so let’s go over some of the most common ones to help you get perfect cookies every time!
1. Can I make the dough ahead of time?
Absolutely! You can prepare the dough and refrigerate it for up to 48 hours before baking. Just let it sit at room temperature for about 10-15 minutes before rolling into balls so it’s easier to handle.
2. Do I have to use red food coloring?
Nope! The red food coloring is just for the classic red velvet look. If you prefer a more natural version, you can leave it out—the cookies will still taste amazing!
3. Can I freeze these cookies?
Yes! You can freeze the unbaked cookie dough balls for up to 3 months. When ready to bake, let them thaw slightly, roll in sanding sugar, and proceed as usual. You can also freeze the baked cookies (without the filling) and add the cream cheese mixture after thawing.
4. How should I store these cookies?
Since the cream cheese filling is perishable, store the cookies in an airtight container in the refrigerator for up to 5 days. If stacking them, place parchment paper between layers to prevent sticking.
5. Can I use a different filling?
Of course! While cream cheese is a classic pairing with red velvet, you can also try:
- White chocolate ganache for extra sweetness
- Nutella for a chocolate-hazelnut twist
- Raspberry jam for a fruity contrast
6. My thumbprints disappeared while baking—what went wrong?
If your cookies puffed up and lost their indentations, you can gently press them again with a spoon right after they come out of the oven while they’re still warm. Also, make sure the dough is properly chilled before baking!
Final Thoughts: A Festive Treat Worth Making
There you have it—Red Velvet Thumbprint Cookies with Cream Cheese that are as delicious as they are beautiful! These cookies bring together the best of red velvet flavor, a creamy tangy filling, and a gorgeous festive look that’s perfect for the holiday season.
Whether you’re making them for a cookie exchange, gifting them to friends and family, or just treating yourself, these little bites of joy are sure to impress. If you give them a try, I’d love to hear how they turned out! Leave a comment with your thoughts, any fun variations you tried, or just to share how quickly they disappeared from the cookie tray.
Happy baking!
Print
RED VELVET THUMBPRINT COOKIES WITH CREAM CHEESE
- Total Time: 1 hour
Description
These festive Red Velvet Thumbprint Cookies are soft, buttery, and packed with a rich cocoa flavor. The tangy cream cheese filling adds the perfect balance of sweetness, making them a holiday favorite!
Ingredients
For the Cookies:
- ½ cup unsalted butter, softened
- ¾ cup granulated sugar
- 1 large egg, room temperature
- 1 teaspoon vanilla extract
- 1 teaspoon red food coloring
- 1¼ cups all-purpose flour
- 2 tablespoons cocoa powder
- ¼ teaspoon baking soda
- ⅛ teaspoon salt
- ¼ cup holiday sanding sugar (for rolling)
For the Cream Cheese Filling:
- 4 ounces cream cheese, softened
- ¼ cup powdered sugar
- ½ teaspoon vanilla extract
Instructions
1️⃣ Prepare the cookie dough: In a large bowl, beat the butter and granulated sugar until light and fluffy.
2️⃣ Mix wet ingredients: Add the egg, vanilla extract, and red food coloring. Mix until well combined.
3️⃣ Add dry ingredients: Gradually sift in the flour, cocoa powder, baking soda, and salt. Stir until a soft dough forms.
4️⃣ Chill the dough: Cover the dough with plastic wrap and refrigerate for at least 30 minutes. This helps prevent spreading while baking.
5️⃣ Shape the cookies: Roll the dough into 1-inch balls, then roll each ball in holiday sanding sugar for a festive touch. Place on a lined baking sheet.
6️⃣ Make thumbprints: Use your thumb or the back of a spoon to gently press an indentation in the center of each cookie.
7️⃣ Bake: Preheat the oven to 350°F (175°C) and bake for 10-12 minutes until the edges are set. Let the cookies cool completely before adding the filling.
8️⃣ Prepare the cream cheese filling: In a small bowl, beat the softened cream cheese, powdered sugar, and vanilla extract until smooth and creamy.
9️⃣ Fill the cookies: Spoon or pipe the cream cheese mixture into the thumbprint indentations of each cooled cookie.
🔟 Chill and serve: Refrigerate the cookies for at least 15 minutes to allow the filling to set. Enjoy!
Notes
- Chilling the dough is important to maintain the cookie’s shape.
- Use gel food coloring for a more vibrant red hue.
- For extra flavor, add a pinch of cinnamon or espresso powder to enhance the chocolatey taste.
- Store cookies in an airtight container in the fridge for up to 5 days.
- Prep Time: 15 mins
- Cook Time: 30 mins
