

If you’re looking for a dessert that screams fun, nostalgia, and indulgence—all without even turning on your oven—this No-Bake Banana Split Cake is the perfect recipe for you. It’s got everything you love about a classic banana split: a crunchy graham cracker crust, a creamy cheesecake-like filling, fresh fruit, and, of course, a decadent drizzle of chocolate sauce. Best of all, it’s ridiculously easy to put together and perfect for summer BBQs, potlucks, or just when you’re craving something sweet.
Why You’ll Love This Recipe
This cake is a dream come true for anyone who loves quick and easy desserts. Here’s why: ✔ No baking required – Just layer and chill!
Perfectly creamy texture – The combination of whipped topping and cream cheese makes it incredibly smooth.
Fresh fruit goodness – Bananas, strawberries, and pineapple add natural sweetness and color.
Make-ahead friendly – Chill it overnight and serve when ready.
Customizable toppings – Hazelnuts, chocolate sauce, or even sprinkles can take it to the next level.
So, grab your mixing bowl and let’s get started on this no-bake delight!
Making the Perfect No-Bake Crust
A good dessert starts with a solid foundation, and in this case, that means a buttery graham cracker crust that holds all the delicious layers together.
What You Need for the Crust
✅ 2 cups graham cracker crumbs
✅ 1/3 cup melted unsalted butter
✅ 1 teaspoon salt
Step 1: Prepping the Crust
- Crush the Graham Crackers: If you have whole graham crackers, pulse them in a food processor until you get fine crumbs. You can also place them in a zip-top bag and crush them with a rolling pin.
- Mix Everything Together: In a medium bowl, combine the graham cracker crumbs, melted butter, and salt. Stir until everything is well combined.
- Press Into the Pan: Take a 9×13-inch baking dish and lightly grease it. Press the crumb mixture firmly into the bottom of the dish using a spoon or the bottom of a glass.
- Chill the Crust: Pop it into the refrigerator while you prepare the filling. This helps the crust set, so it holds together when slicing.
Pro Tip: For an extra-crispy crust, you can bake it at 350°F for 8-10 minutes. But since this is a no-bake recipe, chilling works just fine!
The Creamy Cheesecake Filling
The filling is the star of the show, giving this dessert its velvety smooth texture and sweet, tangy flavor.
What You Need for the Filling
✅ 16 ounces cream cheese, softened
✅ 1/2 cup granulated sugar
✅ 8 ounces whipped topping (Cool Whip)
✅ 1 teaspoon vanilla extract
Step 2: Mixing the Filling
- Beat the Cream Cheese: In a large mixing bowl, use an electric mixer to beat the softened cream cheese until smooth and creamy.
- Add Sugar & Vanilla: Mix in the granulated sugar and vanilla extract. Continue beating until fully incorporated.
- Fold in the Whipped Topping: Gently fold in the whipped topping (Cool Whip) using a spatula. This keeps the filling light and airy.
- Spread Over the Crust: Once everything is well combined, spread the filling evenly over the chilled graham cracker crust.
Pro Tip: For the smoothest filling, make sure your cream cheese is at room temperature before mixing.
Now that our base and filling are ready, it’s time to pile on the fruit and toppings—which is where the magic really happens!
Step 3: Adding the Fruit Layers
To get that perfect banana split vibe, we’re adding three layers of fruit—bananas, crushed pineapple, and fresh strawberries.
What You Need for the Fruit Layers
3 to 4 bananas, sliced
1 (20-ounce) can crushed pineapple, well-drained
20 ounces fresh strawberries, sliced
Layering the Fruit
1️⃣ Banana Layer – Start by arranging evenly sliced bananas over the cream cheese filling. Try to cover the surface as much as possible without overlapping too much.
Pro Tip: To prevent the bananas from browning, you can toss them in a little bit of lemon juice before layering!
2️⃣ Crushed Pineapple Layer – Drain your canned crushed pineapple really well (you don’t want extra liquid making the dessert soggy). Spread it evenly over the bananas.
Pro Tip: Use a strainer or cheesecloth to squeeze out as much liquid as possible from the pineapple!
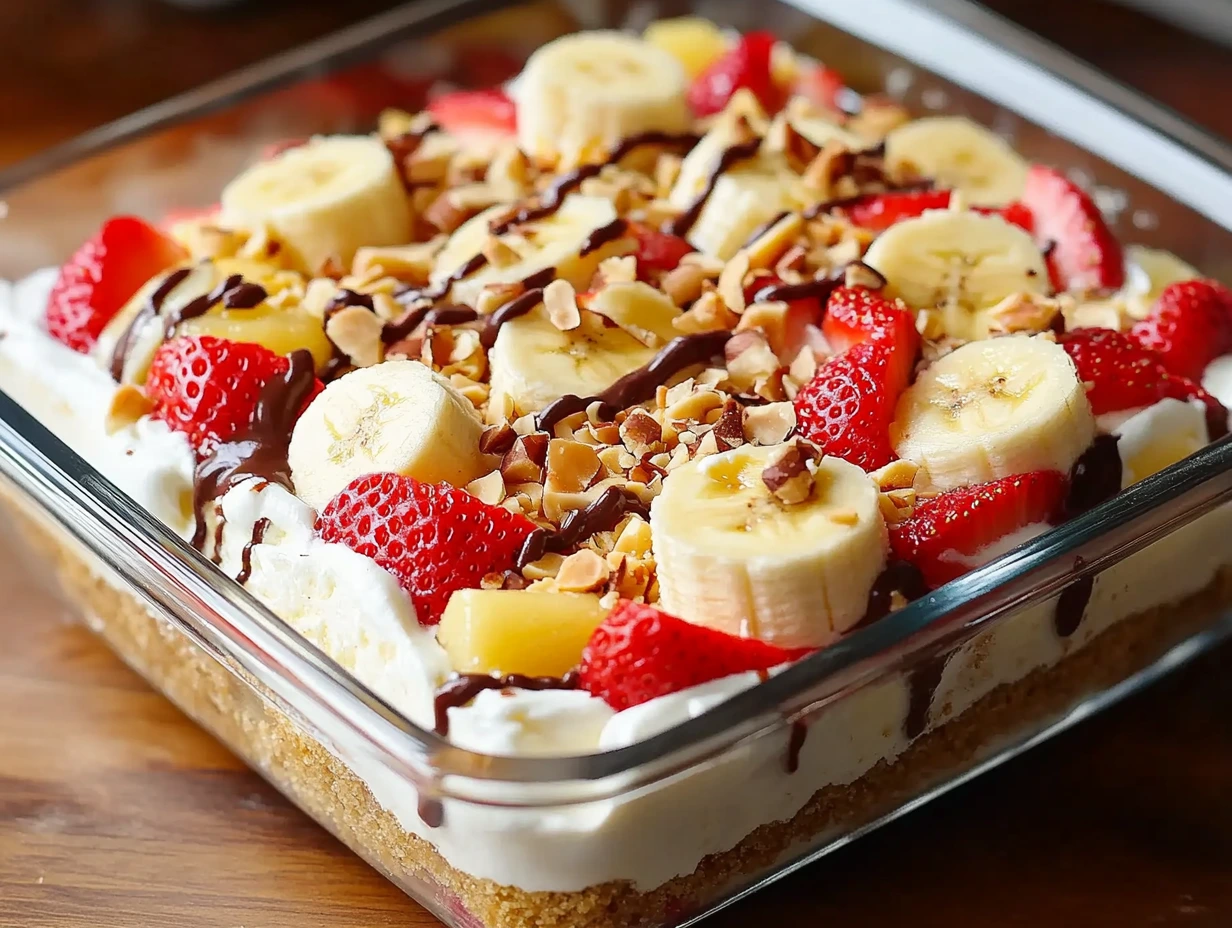
3️⃣ Strawberry Layer – Arrange sliced fresh strawberries on top of the pineapple, spreading them out evenly. This layer not only adds a fresh, juicy bite but also makes the cake look so vibrant and beautiful!
And just like that, we’re almost there! Now, all that’s left is topping this beauty with whipped cream, nuts, and a drizzle of chocolate.
Step 4: The Finishing Touches
This is what makes this dessert really feel like a banana split—that final layer of whipped topping, crunchy hazelnuts, and a drizzle of chocolate sauce!
What You Need for the Toppings
8 ounces whipped topping (Cool Whip)
1/2 cup chopped hazelnuts
Chocolate sauce (for drizzling)
Adding the Toppings
1️⃣ Spread the Whipped Topping – Take your extra container of whipped topping and gently spread it over the strawberry layer. Make sure it’s nice and even—this will act as the final creamy layer.
2️⃣ Sprinkle on the Hazelnuts – Add a generous sprinkle of chopped hazelnuts across the top. You can also use pecans or walnuts if you prefer!
3️⃣ Drizzle with Chocolate Sauce – Using a spoon (or a squeeze bottle), drizzle chocolate sauce all over the top. You can go for a zig-zag pattern or just go wild—whatever makes your heart happy!
Want an extra indulgent twist? You can also add maraschino cherries on top, just like a real banana split!
Step 5: Chill & Serve
This cake is best when it’s chilled, so the layers can really set together, making it easier to slice and serve.
Chilling the Cake
Refrigerate for at least 4 hours, or overnight for the best results.
This gives the filling time to firm up, making it easier to cut into neat squares.
Serving
When ready to serve, simply slice into squares and enjoy this cool, creamy, fruity delight!
Pro Tip: For extra clean slices, use a sharp knife and wipe it between cuts to get those perfect layers in every bite!

Want to Customize Your Banana Split Cake?
One of the best things about this no-bake cake is how easy it is to customize! Here are a few fun variations:
Swap the Nuts
- Not a fan of hazelnuts? Try pecans, walnuts, or almonds instead!
Make it Extra Chocolatey
- Sprinkle mini chocolate chips between the layers for an extra chocolate kick!
Add More Toppings
- Top each slice with whipped cream, a cherry, or sprinkles for a more festive look.
Make it Dairy-Free
- Use dairy-free whipped topping and vegan cream cheese for a dairy-free version.
FAQs & Final Thoughts
By now, your No-Bake Banana Split Cake is chilling in the fridge, just waiting to be enjoyed! This easy, creamy, fruity dessert is the perfect treat for warm days, special occasions, or just because you deserve something sweet.
Before we wrap up, let’s go over some frequently asked questions to make sure your cake turns out perfect every time!
Frequently Asked Questions (FAQs)
1. How long does No-Bake Banana Split Cake last in the fridge?
This dessert stays fresh for up to 3 days when stored in an airtight container in the fridge. The bananas may start to brown after a day or two, so if you’re making it ahead of time, consider adding the banana layer just before serving.
2. Can I freeze this banana split cake?
Yes! You can freeze it for up to 1 month. Just wrap the entire dish tightly in plastic wrap and then in aluminum foil. When you’re ready to serve, let it thaw in the fridge overnight.
3. What can I use instead of graham crackers for the crust?
If you’re out of graham crackers, you can use:
✔ Vanilla wafer cookies – Crushed for a slightly sweeter crust.
✔ Oreo cookies – For a chocolatey twist.
✔ Digestive biscuits – A great alternative if you’re outside the U.S.
4. Can I use fresh pineapple instead of canned?
Absolutely! Just make sure to finely chop it and drain it really well to avoid adding too much moisture to the dessert.
5. Can I make this dessert in individual servings?
Yes! Instead of a 9×13-inch pan, try assembling the layers in mason jars or small dessert cups for an easy-to-serve, individual treat.
6. How do I keep the bananas from turning brown?
Bananas tend to brown quickly, but here are a few tricks:
✔ Toss them in lemon juice or pineapple juice before layering.
✔ Cover them completely with the other ingredients to limit air exposure.
✔ Assemble the cake as close to serving time as possible for the freshest look.
7. What’s the best way to serve this cake?
This cake is best served cold and straight from the fridge. If you want extra indulgence, top each slice with a maraschino cherry and an extra drizzle of chocolate sauce!
Final Thoughts & Why You’ll Love This Dessert
This No-Bake Banana Split Cake is everything you want in a quick, easy, and delicious dessert:
✔ No baking required – Just layer, chill, and enjoy!
✔ Perfectly creamy & fruity – The combination of whipped topping, cream cheese, and fresh fruit is irresistible.
✔ A total crowd-pleaser – Everyone from kids to adults loves this fun, nostalgic dessert.
✔ Easily customizable – Make it dairy-free, switch up the toppings, or add extra chocolate!
Whether you’re making this for a backyard BBQ, family get-together, or a simple weeknight treat, it’s sure to be a hit.
If you try this No-Bake Banana Split Cake, I’d love to hear how it turned out! Drop a comment below, share your own variations, or snap a picture and tag me on social media. Happy baking—without actually baking!
Now go grab a fork and enjoy this slice of heaven!
Print
No-Bake Banana Split Cake
- Total Time: 4 hours 20 mins
Description
This No-Bake Banana Split Cake is a delicious and easy dessert that brings all the flavors of a classic banana split into a creamy, dreamy cake. Perfect for summer gatherings or whenever you want a refreshing treat without turning on the oven
Ingredients
For the Crust:
✅ 2 cups graham cracker crumbs
✅ 1/3 cup melted unsalted butter
✅ 1 teaspoon salt
For the Filling:
✅ 16 ounces cream cheese, softened
✅ 1/2 cup granulated sugar
✅ 8 ounces whipped topping (Cool Whip)
✅ 1 teaspoon vanilla extract
For the Toppings:
✅ 3 to 4 bananas, sliced
✅ 1 (20-ounce) can crushed pineapple, well-drained
✅ 20 ounces strawberries, sliced
✅ 8 ounces whipped topping (Cool Whip)
✅ 1/2 cup chopped hazelnuts
✅ Chocolate sauce (for drizzling)
Instructions
1️⃣ Prepare the Crust:
In a medium bowl, combine the graham cracker crumbs, melted butter, and salt.
Press the mixture into the bottom of a greased 9×13-inch baking dish.
Refrigerate while you prepare the filling.
2️⃣ Make the Filling:
In a large bowl, beat the cream cheese with the sugar and vanilla extract until smooth.
Fold in the whipped topping (Cool Whip) until well combined.
Spread the filling evenly over the chilled crust.
3️⃣ Add the Layers:
Arrange the banana slices over the filling.
Spread the drained crushed pineapple evenly over the bananas.
Add a layer of sliced strawberries on top of the pineapple.
4️⃣ Top and Chill:
Spread another layer of whipped topping over the strawberries.
Drizzle with chocolate sauce and sprinkle with chopped hazelnuts.
Cover with plastic wrap and refrigerate for at least 4 hours, or overnight for best results.
5️⃣ Serve:
Slice and serve the cake chilled. Enjoy!
Notes
- Chilling is key! Letting the cake sit in the fridge allows all the flavors to meld together.
- Make it extra indulgent by adding maraschino cherries on top!
- Nut-free option: Swap hazelnuts for crushed Oreos or sprinkles.
- Serving tip: A drizzle of caramel sauce adds an extra touch of decadence.
- Prep Time: 20 mins
- Cook Time: 4 hours
